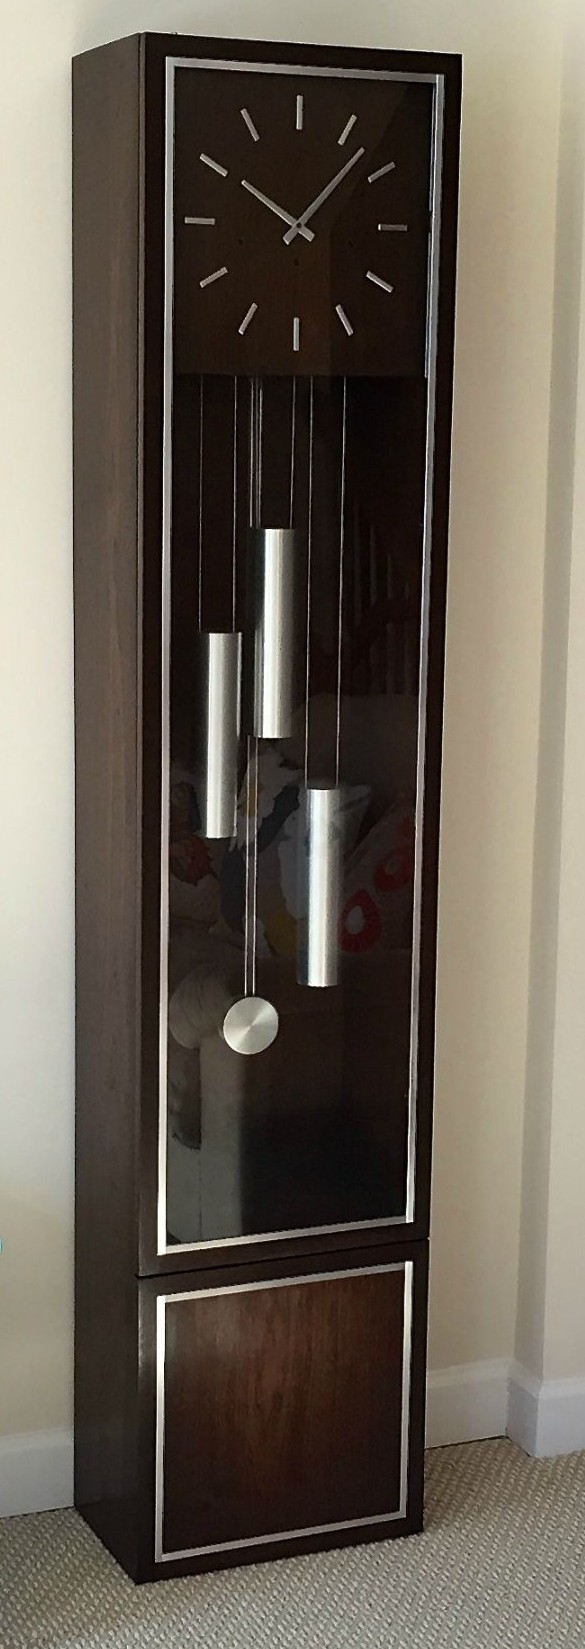
I originally intended this site to be a repository of all my musings. Therefore, I need to apologize for the (exclusive) grandfather clock content. (Perhaps) more to come....
Archives: 2015
Grandfather Clock - Wood Selection
I needed approximately 30 BF of walnut. I checked all of the local stores, and found the availability of walnut in the quantities I needed was fairly limited. One store wanted $15/BF, however $8-10/BF seemed to be closer. It wasn't terribly eager to spend $450 on wood. The only available boards were < 10", therefore, I was going to have to glue up panels for the sides.
I scoured Craigslist, and even went to a garage sale that had 300-400 BF. However, the boards were a bit too rough for my comfort level, almost all with live edges. Again, getting wide enough and long enough boards was going to be a challenge.
I found a very assuming Craigslist post of someone trying to sell Walnut. We exchanged a few emails, but I wasn't overly optimistic. I borrowed the neighbors truck, and headed to his property. It was nestled in the woods, with piles of wood and logs everywhere. It was run by two gentlemen. As soon as I got there, they had 6 boards, 5/4+ that were 9 3/4" wide and over 14' long. It was exactly what I was looking for! They had milled it that morning. The wood itself has a beautiful grain pattern. We did some quick math based on assumed yields (6 boards @ 12', 9" width, 1" thick). Approximately 50 BF, he wanted $5/BF. We agreed on $200.
We went to load them in to the truck, and quickly discovered that was going to be a disaster. Fourteen feet boards just don't fit in a pickup. They offered to throw it on their trailer and drop it off at my house. Very generous and convenient.
 I also mentioned that I would love to get a 15"x15" piece to use for the clockface. We walked around his yard, looking at various logs, and seeing if we could find something large enough. We located a good looking burl that had good potential. They tossed in on the mill and started slicing it up. Unfortunately, there was a bit of rot on the inside, and a 15"x15" piece just wasn't in the cards. They were confident they would find something that would work and let me know.
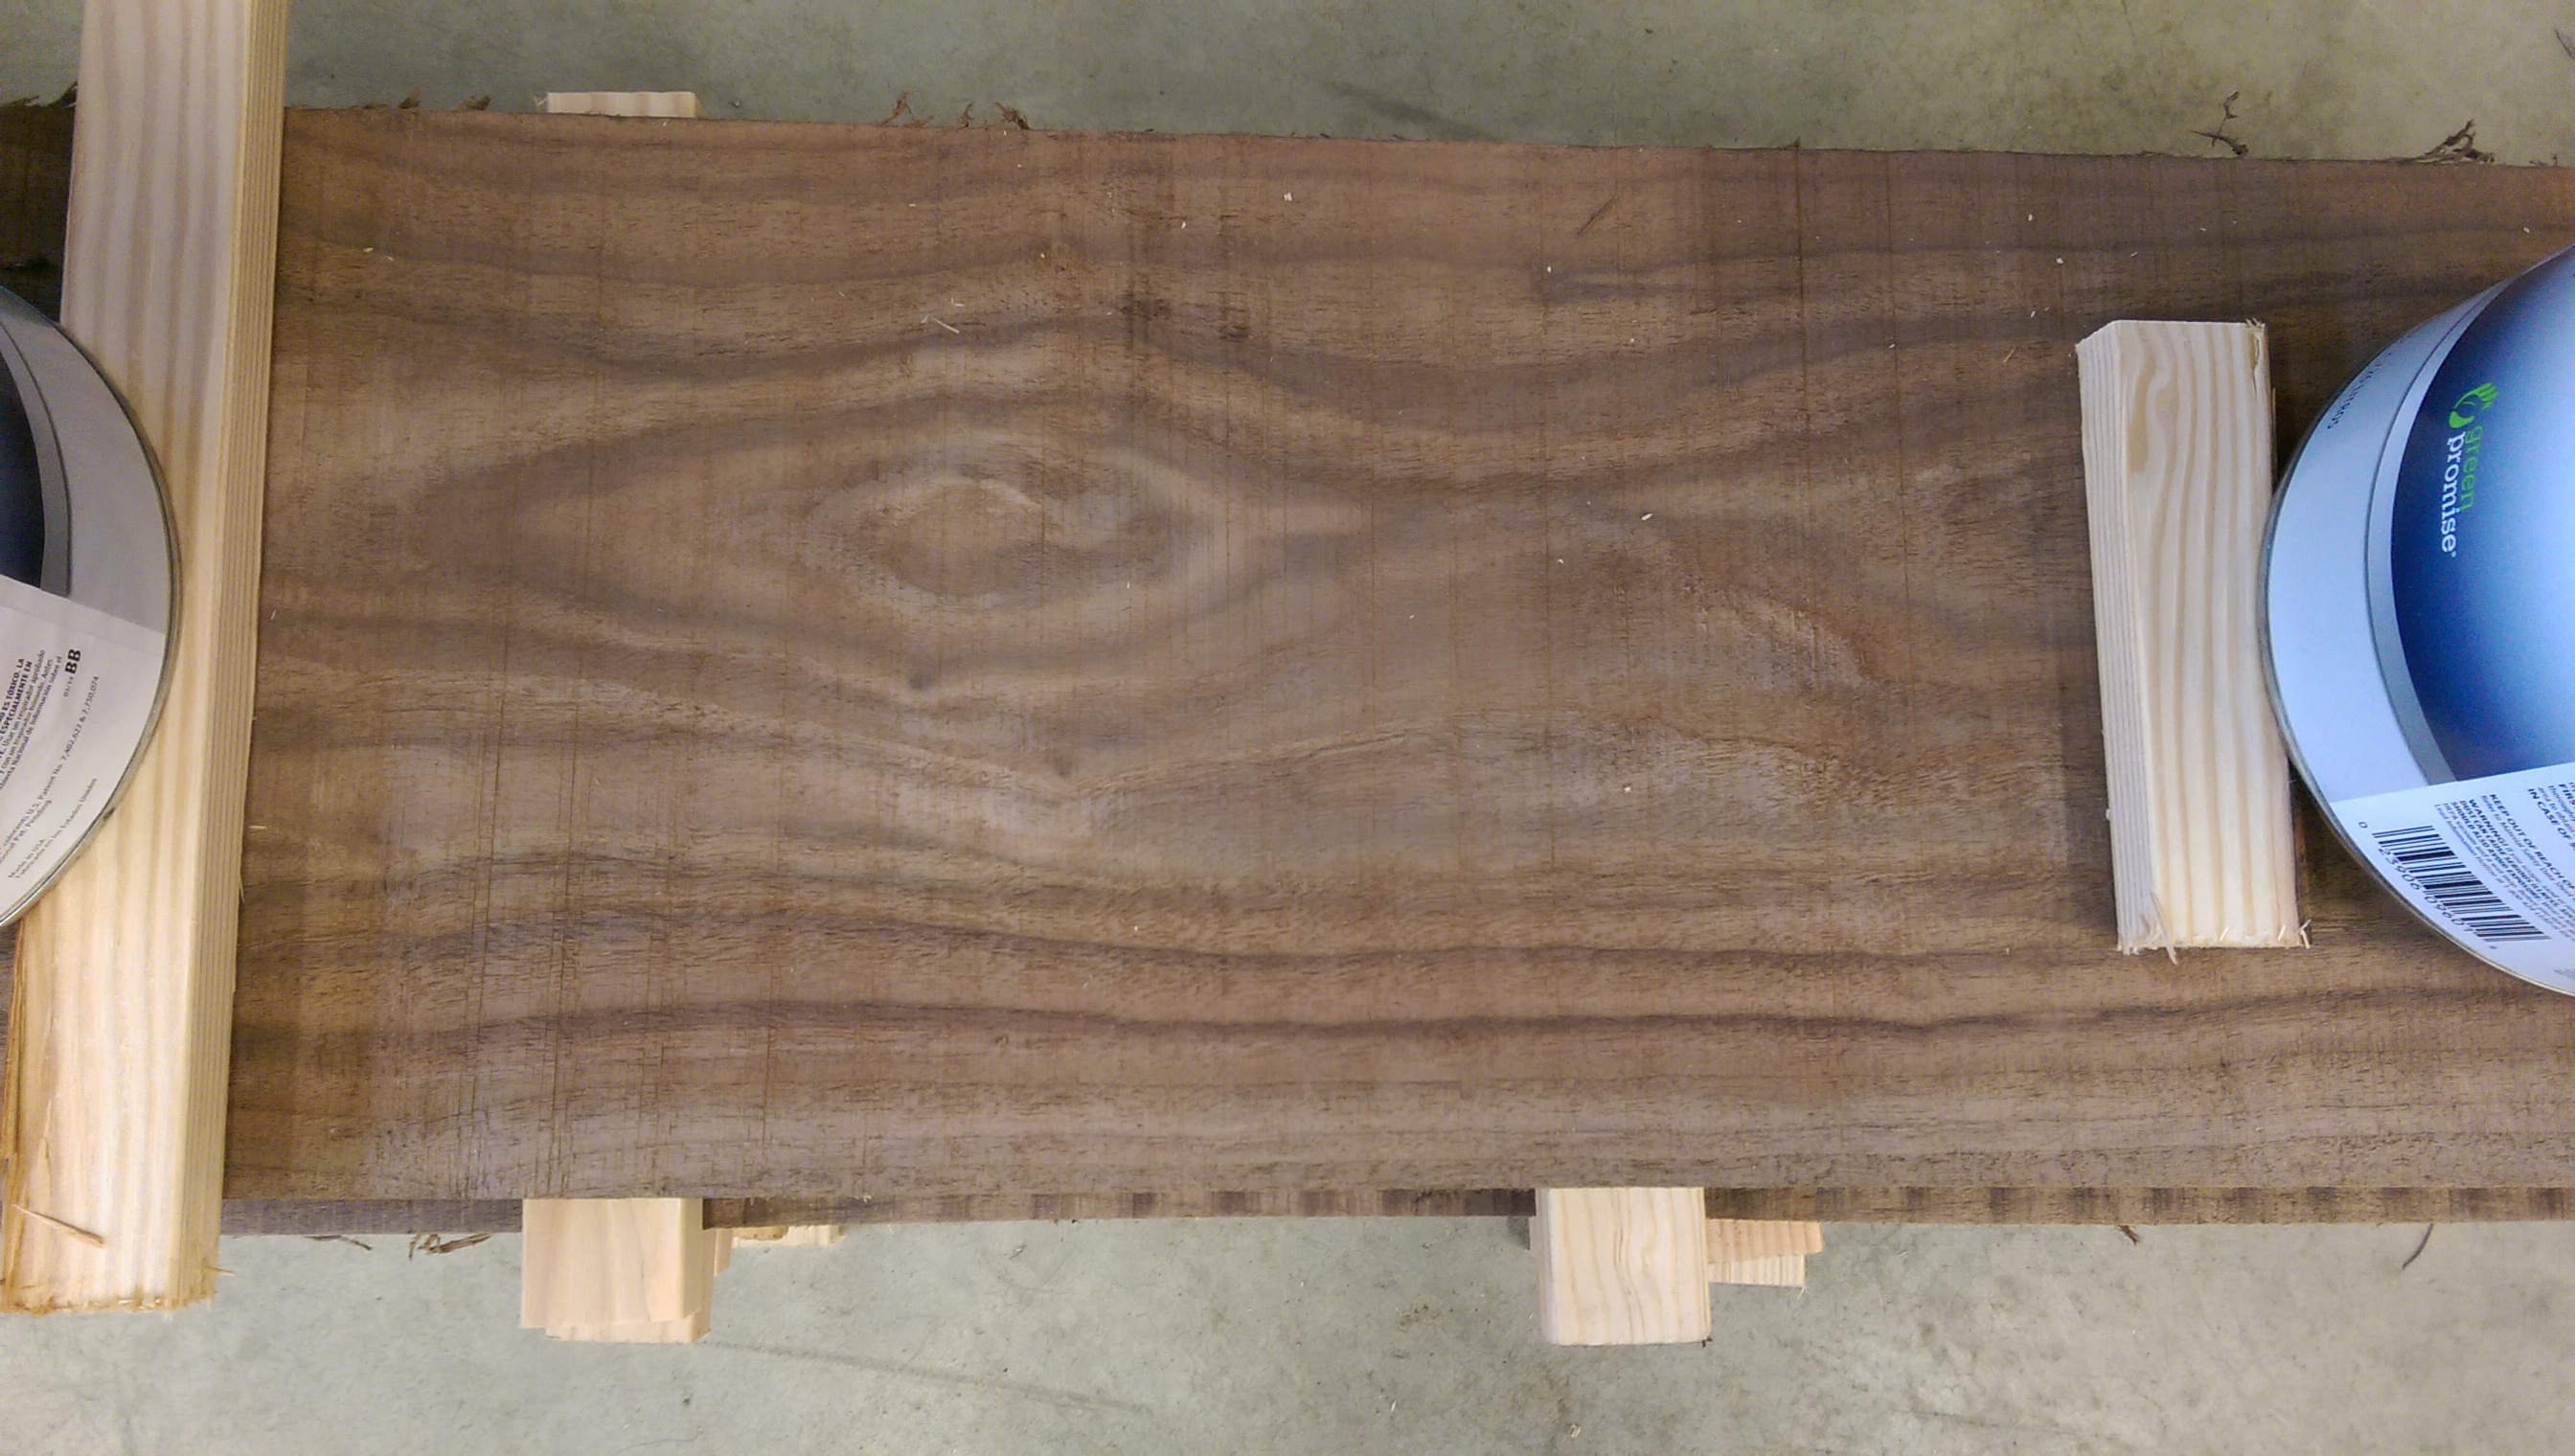
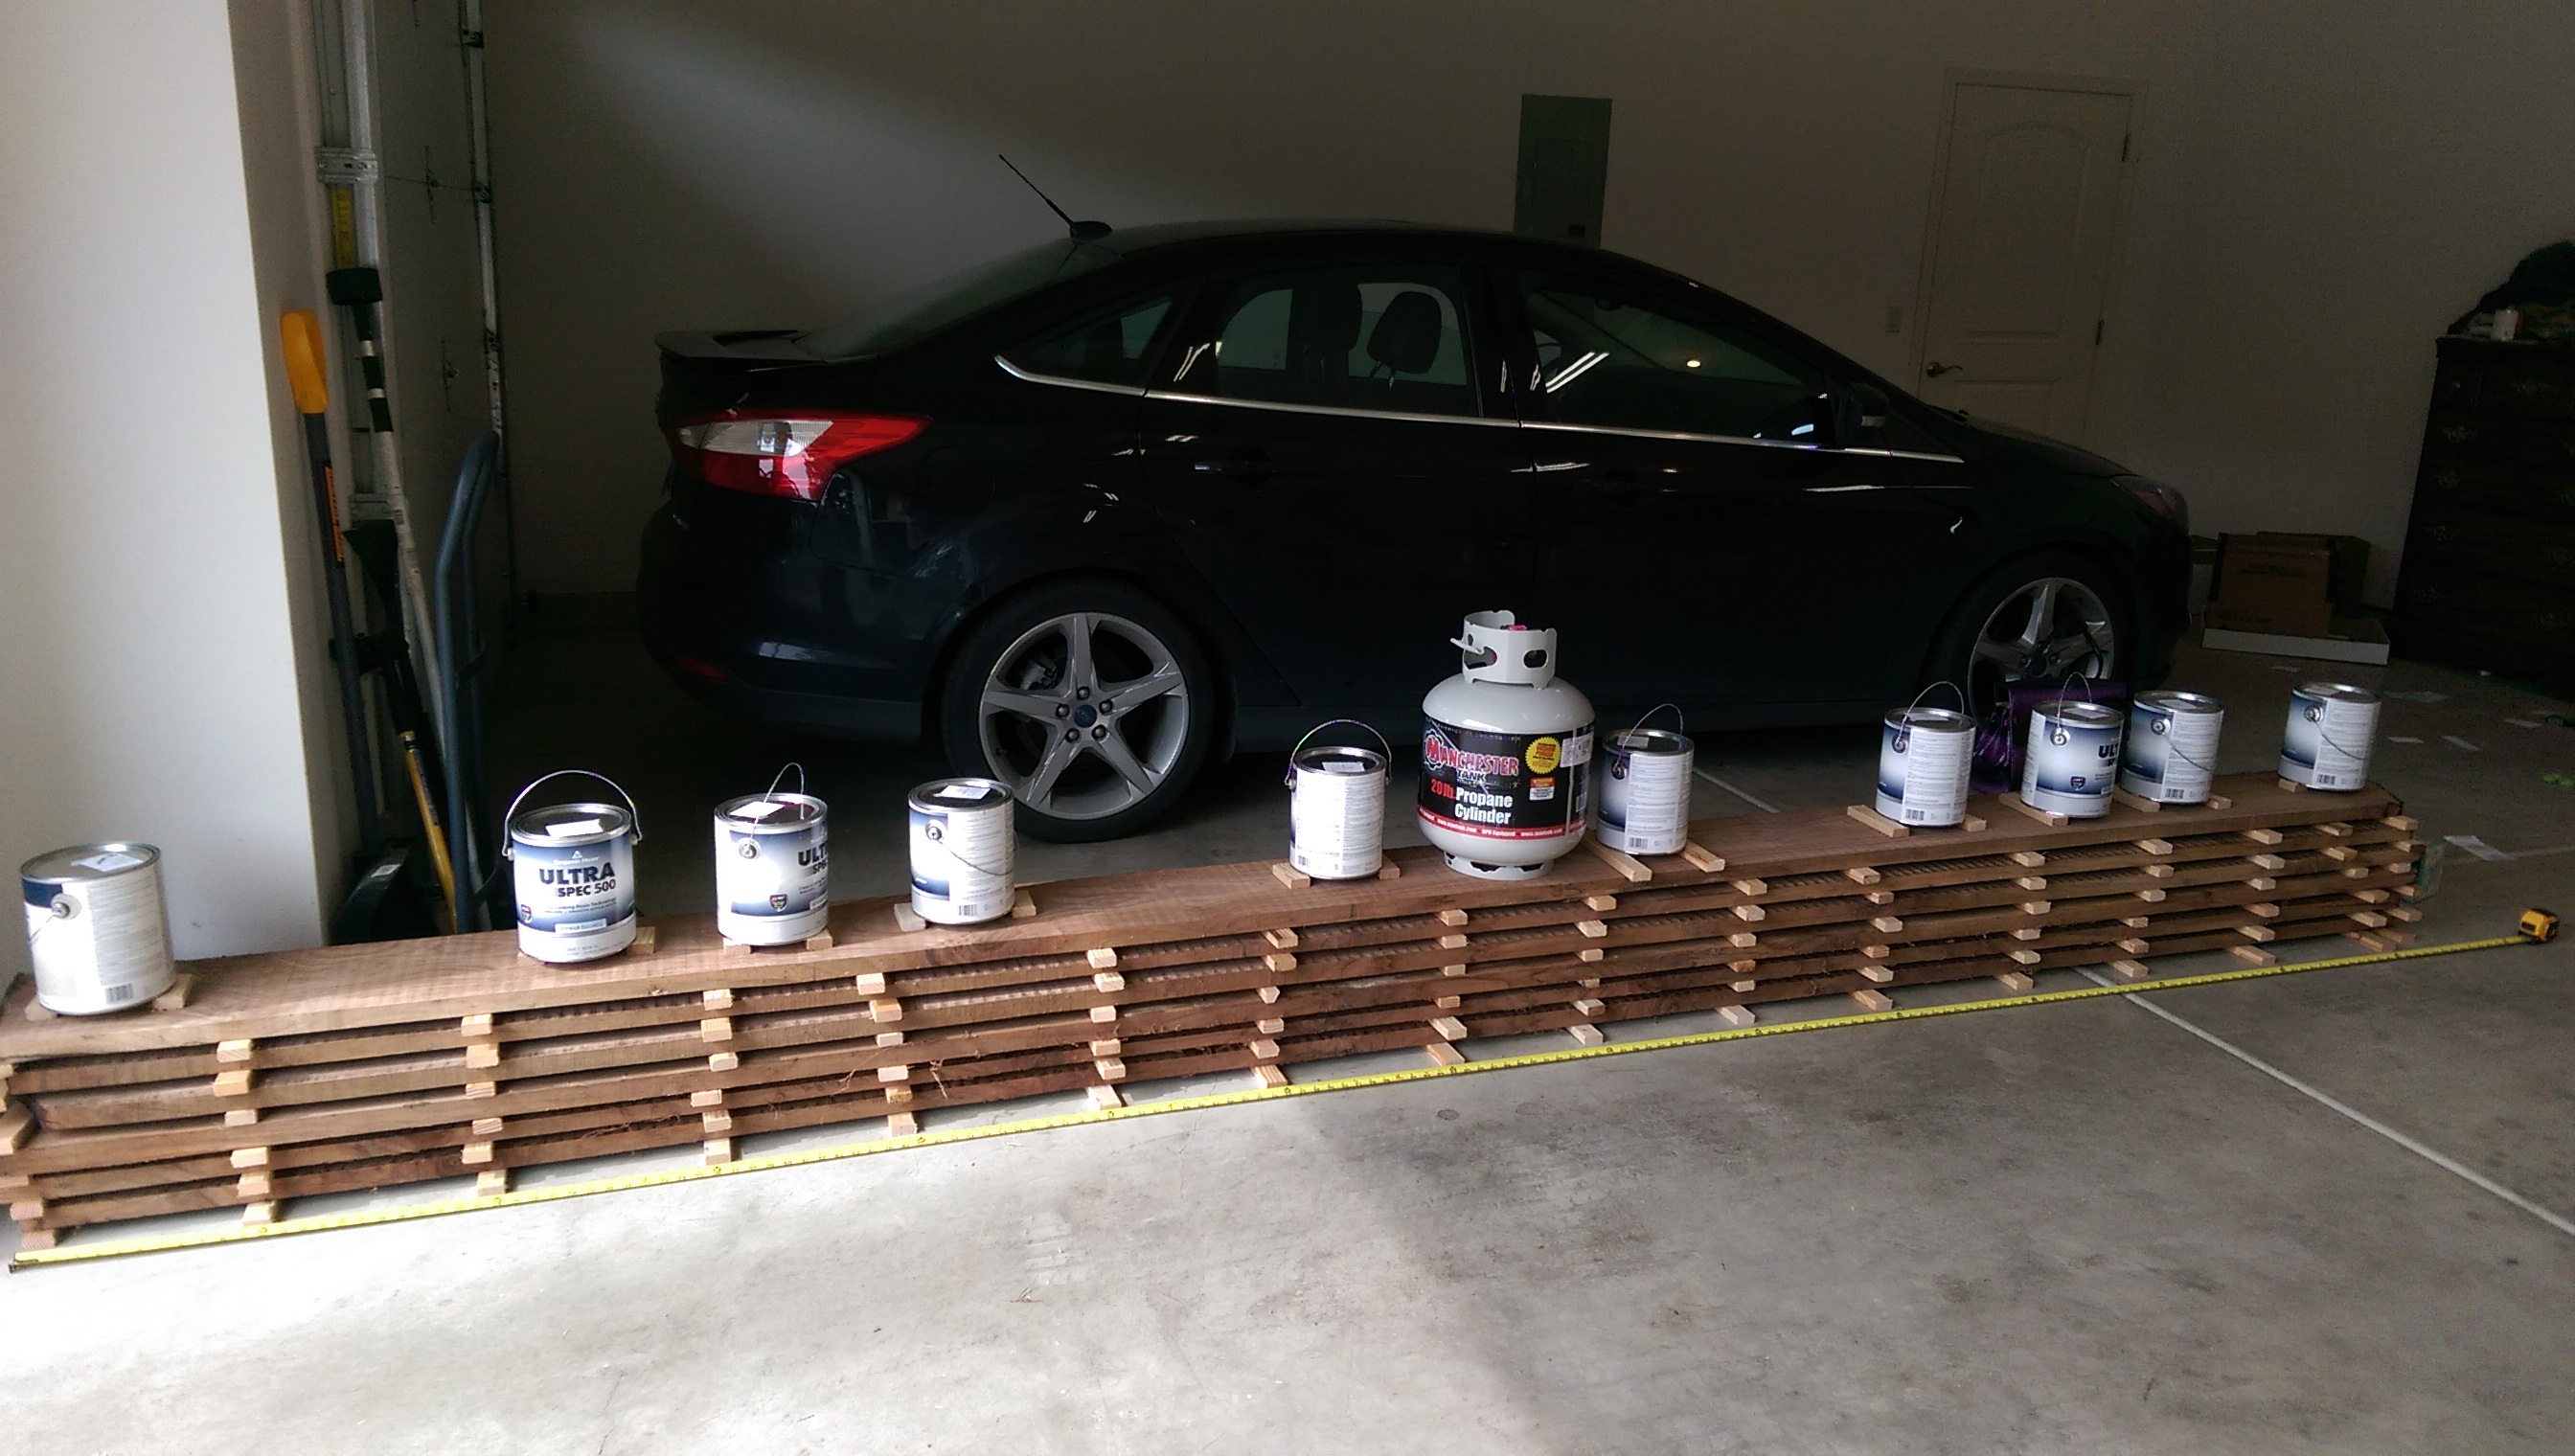 The wood made it home without any issue. I now have it stickered and end sealed with polyeurethane. The tough part is now going to be waiting for it to reach the proper moisture content. It currently is in the 25-35% range. I believe 12% is a reasonable target.
I did a quick recalc on the total volume. 14.5' x 9 3/4" x 8" (total thickness) = 94 BF! That works out to $2.13/BF! It is hard to complain about that.
 Also, since the boards are 9 3/4" wide, I believe I can make the sides without gluing two together. A 9" depth should work great. Since they are 14.5' long, I can use a single board to make both sides, and another board to make the back. Figure another board for the rest, and suddenly I have twice as much wood as I need. My original figures (8 boards) were based on requiring glueups and 8' lengths. I really scored on this one. And I know I'll be back to visit these gentleman.
Grandfather Clock - Case Design
 This post concentrates on the design of the wood case. It is based on the dimensions determined in a previous post.
Autodesk Inventor was used for the modeling. See the Drawings for the details.
A couple of notes:
- All material from 4/4 black walnut. I am still looking for a reasonable source of the material. The best bet so far is from a local supplier with 4/4, approximately 7" wide and 7' long for $8.50/BF. However, I am still looking around for wider or cheaper stock.
- It looks like all pieces will require a glue up of multiple boards. I do not own a jointer, so planer and tablesaw jigs will be required. I have never done panel glue ups, and that makes me the most nervous.
- All Dados will be 3/8" deep. A router with a 1/2" upspiral bit will be used to create them.
- The mounting of the movement will require a specialized piece. It will need to have holes for the weights, and not interfere with the pendulum or chimes. There are taped holes on the bottom for mounting screws. The layout of these holes is going to be a pain, and will be done closer to game time.
- I will design the doors after the case is built.
Grandfather Clock - Case Dimensions
The Movement
The case will be built around the movement. The critical dimensions are shown below. The majority of them were measured with a tape measure. Not exact, but sufficient for this exercise.
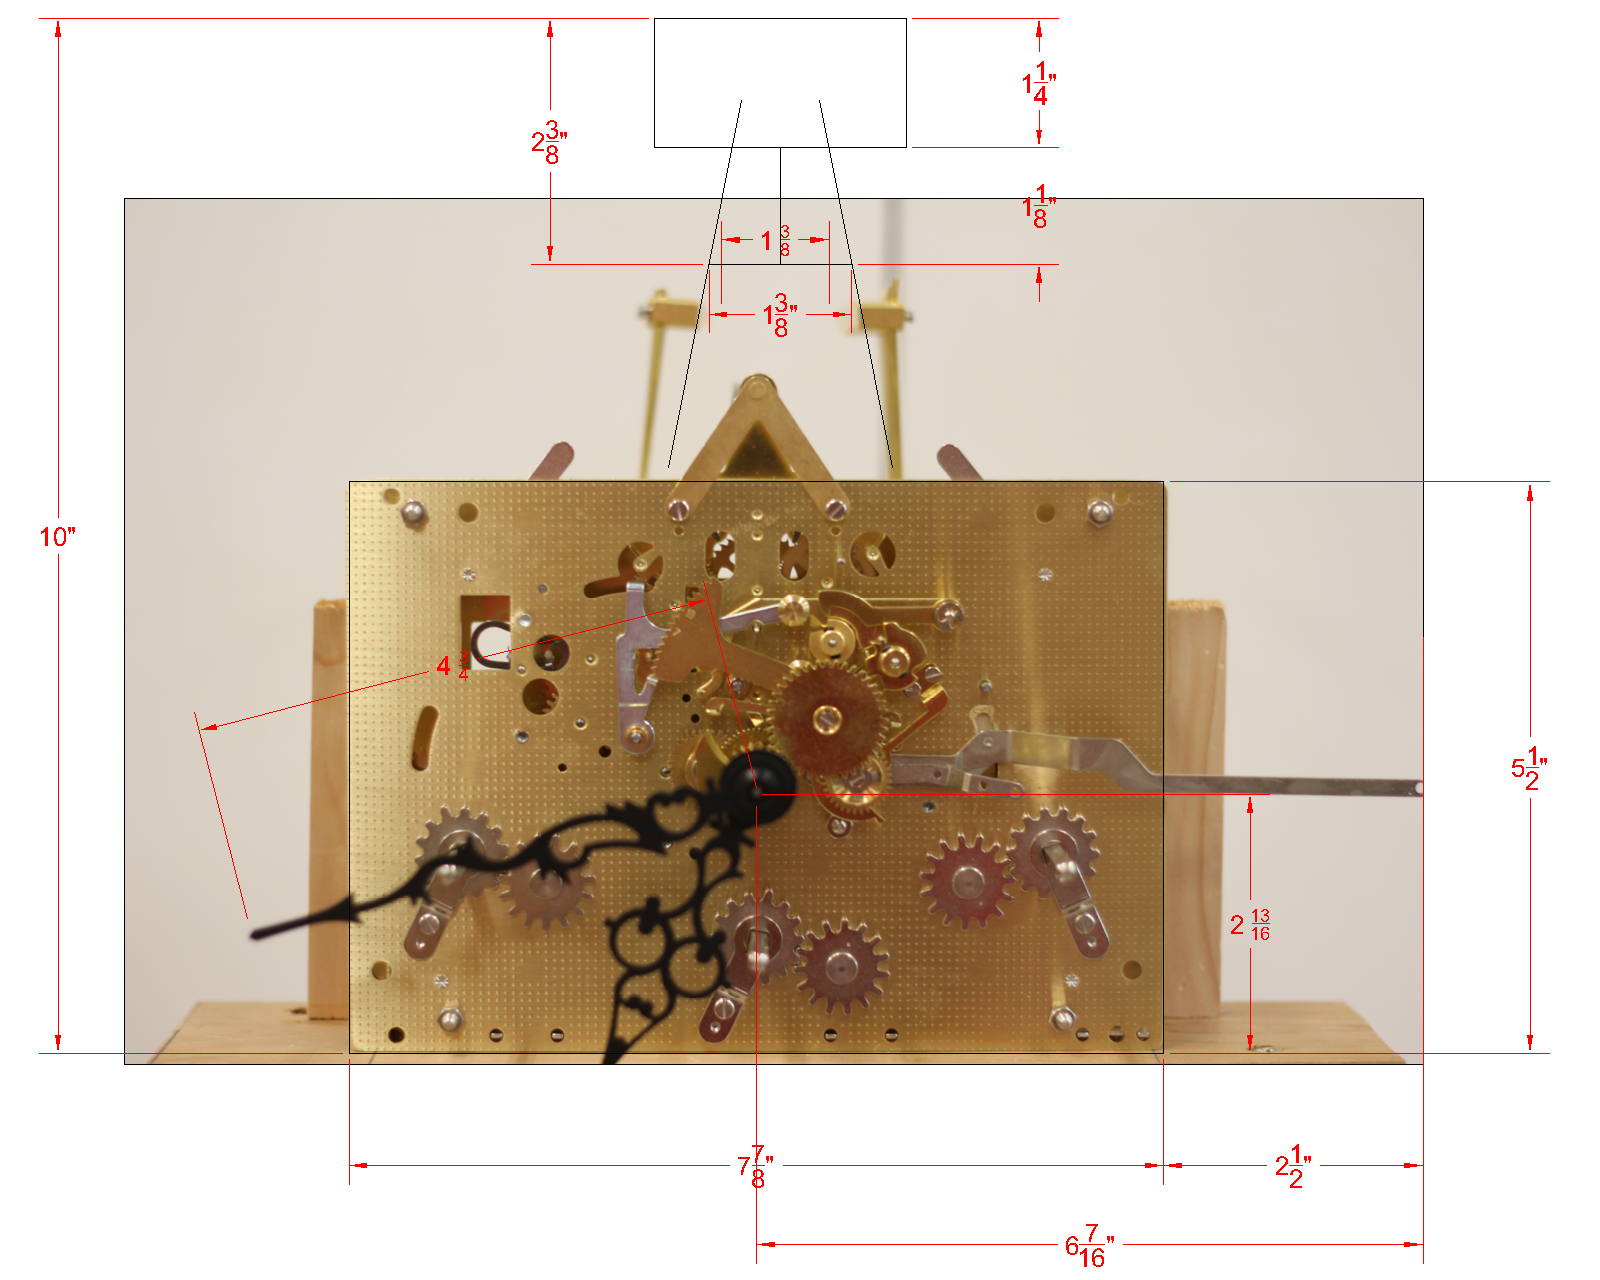

Face Width
- 2(Hand shaft to edge of lever): 2(6 7/16") = 12 7/8"
- Movement width: 7 7/8"
- Hand width: 2(4 3/4") = 9 1/2"
Use a 14" wide face (Case ID). For reference, Hermle 1161-853 round dials are 13" wide, with a 11" diameter timetrack. This will yield a total width of 14" + 1" + 1" = 16".
Face Height
- Hand shaft to top of chime block: 10" - 2 13/16" = 7 3/16"
WIthout making the face wider, the face is not going to be able to be square. We should also give ourselves some room in the top depending on the angle of the chime rods. Therefore, go with 7 3/4" on top, and 7" on bottom. Use a 14 3/4" tall face.
Case Depth
The depth of the case, neglecting the door. The slimmer the profile the better. The door will add about 1"
- Tip of winding shaft to back of hammer: 1 1/2" + 1 7/16" + 4 1/4" = 7 3/16"
- Back of hammer to back of chimes: 5/8"
- Minimum depth: 7 13/16"
Use 9" deep case.
Case Height
- Face: 14 3/4"
- Bottom for square: 14"
Use 78" tall case. This was determined based on the space.
Grandfather Clock - Test Setup
The Setup
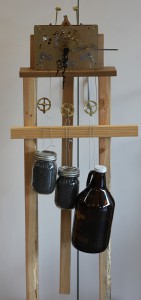 I finally got tired of having a movement, and not having it in action. However, a reasonable case is way to far away, so I put together a test rig. The rig consisted of some 2x4s, and a cedar top plate that allowed the cables for the weights to pass through. I picked up some lead shot (for making shot gun shells) for weight. The left two weights are 7.7 lb mason jars. The right weight is a 9.9 growler. The horizontal bar was required to keep the weights from interfering with the pendulum.
It actually took me more time than I care to admit to attach the pendulum (a 1x2) to the leader. Getting a rigid connection proved to be a challenge. The best solution ended up slotting the pendulum, and sliding it on the leader.
How it Works
It runs! It ticks! It tocks! When I put hands on it, they even move. I spun the minute hand a little bit and the hammers started firing. A quick beat count with a stop watch yields it is 14% fast. Adding a clamp to the bottom of the pendulum got it to within 4%. Not bad for no calibration.
Grandfather Clock - Pendulum Design
The pendulum is the most important parameter in keeping accurate time. Therefore, it is critical to get the pendulum design correct.
The Period
The only parameter governing the period of an ideal pendulum (on earth), is the length.
The 1161-853/94 is geared for 3960 beats per hour [Hermle Service Manual]. In order to make the math work out correctly, I presume that each half-cycle of the pendulum is a beat.


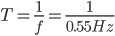

Therefore, we are going to have to target a pendulum design that maintains a  period.
Let's see how that compares with an ideal 94cm pendulum.

Well, it looks like an ideal pendulum isn't going to do the trick at 94 cm. Therefore, what we really want is a pendulum with an effective length,  , of
, of


Therefore, what we really want, is a pendulum with an effective length of 32.3 in!
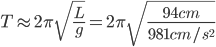
Physical Design
The pendulum will consist of two components. See the Introduction for the inspiration for this design.
Bob
A bit arbitrarily, the bob was selected to be a 4" diameter, 1" thick, 6061 aluminum disc. Assuming a density of  , the bob will weight 1.23 lb.
Rod
The rod will consist of a 3/8" x 3/8" x 1/16" U-Shaped 6061 aluminum channel with a walnut inlay. Using the same assumed density of aluminum, and a density of walnut of  , the rod will weigh 0.012lb.
Length
I have to admit, I put together a fairly comprehensive spreadsheet to calculate the effective length and period. I attempted to account for the moment of inertia of the rod and the bob itself. However, at the end of the day, the eccentricity of the bob outweighs the other factors. Therefore, the distance to the center of the bob should be 32.3 in.
Connection to Movement
 The movement has a pendulum leader that is 5.5" long (should be included in the total pendulum length. There are hooks available that are designed to interface with the pendulum that I will likely use. However, I still need to develop a way to tweak the length.
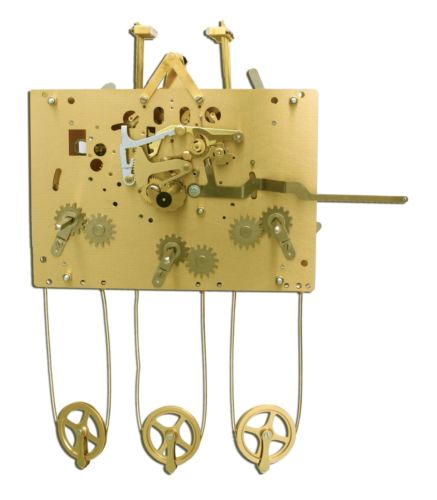
Grandfather Clock - Movement Selection

The heart of any clock is the movement [which is apparently what horologists (which is apparently what clock people call themselves) call the mechanism]. Obviously the case must accompany the motions of the clock, therefore the general principle is to design the case around the movement. So, here we are at step 1, select a movement.
If I am going to go to all of the effort of building a grandfather clock, I want it to have the guts of a real grandfather clock. No electric or quartz movements here. For some reason, the mechanical movements are more "honorable". With them, they come with these great advantages:
- More expensive
- More complicated
- Less accurate
- Require more tweaking
- Require winding
But, to hell with technology, we are doing it the way Galileo intended; with gears, weights, chimes, and we can't forget the pendulum.
Selecting a Movement
My first step was to jump on eBay and look for grandfather clock movements. I am not entirely sure why, but I quickly zoned in on the Hermle movements. I am not going to say they are superior movements to others, but they appear to be popular and in the appropriate price range. Additionally, once a manufacturer was selected, it significantly reduces the search space, easing the selection of a particular model.
To my surprise, there is limited knowledge on the internet about grandfather clock movements. For some reason, clock knowledge in old white men's heads appears to be air-gaped from the internet. Hermle movements have model numbers such as 451-050/94, and I wanted to know what these numbers meant so I could select the proper movement. This site proved helpful to determine the proper movement. Jump to there, and you can follow my logic.
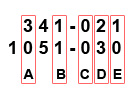
Group A: I wanted something weight driven. That leaves the 260, 451/461/471 or 1151/1161/1171 series'.
Group B: I wanted pendulum regulated. That eliminates the 260.
Group C: Chain or cable drive? Eh, what do I care.
Group D: All of the grandfather clocks I have seen have a separate set of hammers for chime (at the top of the hour) and strike (on the quarter hour). Therefore, we are looking for something with a "5" in the middle slot of the second set of digits.
Group E: This group indicates the hand shaft length. Since the clock face is going to be wood, it will likely be about an inch thick. Therefore, the 53 mm (about 2 inches) hand shaft is the way to go. Therefore, we are looking for something that ends in a "3".
That leaves just one variable, the most important variable, the pendulum length. It is a bit ironic that the variable that defines the entire mechanism is missing from the model number, but is indicated following it. The mechanisms of interest come in either a 94 or 117 cm pendulum length. Since I am not building a massive clock, I decided the 94 cm (37 in) pendulum would make the most sense.
The Search
With that, I thought the 451-050/94 would be suitable, and went to ask the experts at the National Association of Watch & Clock Collectors (NAWCC). They have a forum for clock lovers, that has a moderate level of activity. I laid down my goals, and asked the experts. Their first advice, was to call Mark Butterworth (recall the air-gap?).
I gave Mark a call, and he advised me to hit up some online stores, and give him a call back. However, he did mention that cable driven movements are superior, and that narrowed the search down to 1151, 1161 or 1171 movements. Cable movements are wound using a hole in the face. That is what the clock I had at home growing up required (hmmm, projecting?), so I decided cable drive it was. Next step, determine what differentiated the 1151, 1161 and 1171. It turns out, the 1161 can be equipped with Auto Night Shut Off (ANSO), and the 1171 is always equipped with ANSO. I hadn't even considered ANSO, and that would have been a critical mistake. I know the first time the thing "bonged" in the middle of the night, my wife would have stopped it, never for it to be revived.
So that leaves the 1161 and 1171 as options. More specifically, either an 1161-853 or 1171-853. I jumped on eBay and looked at several used 1161s. However, it wasn't always clear if ANSO was included. Additionally, since I know almost nothing about these things, I wanted one that was working well. I spoke with a retired man in Arizona, who writes repair guides, who had a working 1161-853 that had ANSO. However, after he was paid, he realized it did not have ANSO and reversed the transaction. Oh well, time (ha) to keep looking.
There are plenty of new movements on eBay as well. I found 3 major vendors that sold the 1161-853. I called the first one, who promised phone support, and got a full voicemail box. Moving on. The second vendor I called was a retail operation in Milwaukee, Earl at Hawkins Clocks. Earl was very friendly and knowledgeable, and I now have an 1161-853/94 on the way. He was kind enough to throw in some extras, such as hands, push rods and mounting brackets all for less than the cost of the movement in his eBay listing.
It Arrives!
The movement came a few days after I ordered it. It showed up in a custom styrofoam box that appears to have treated it well.

Grandfather Clock - Introduction
I would be lying if said this modern grandfather clock didn't inspire me. Credit is certainly due, and I first stumbled upon it in a Reddit thread by the creator.
Since taking an amateur interest in woodworking about six months ago, I am always looking for projects. However, the overlap of projects that I am interested in, capable of, and wife pleasing are fairly limited. However, the lady took a look at that grandfather clock and told me to "make it happen", so that is what this series is about.
Let me start with my credentials:
- Clock knowledge (the fact that I am calling it "clock knowledge" is a pretty good indicator)
- None
- Woodworking experience
- Workbench
- Shop furniture
- Porch swing the lots of "character"
- Cutting board which was mis-finished, and cracked before use
So, there you have it. I set out to create a piece of furniture that typically constructed by ornate artists, and is operated by mechanisms developed based on years of experience and extreme precision.
First things first, let's start with the guts...
Hello world!
Welcome to Engineered Musings! This is a site to document my random projects that engulf my mind.
You'll notice I haven't bothered to design a logo, customize the color scheme, or write an about page. That doesn't interest me. So, let's get started!